Day 1 Access & Information Checklist
Start here, on day one, before the workbooks. Everything on this page is either an access request or a document request, and every one of them has a lead time we do not control — carrier records take days to arrive, and delegated access needs your account owner. Getting these moving now means the discovery work later is never waiting on a login or a bill.
You do not need to finish this page before starting the workbooks
These run in parallel. The point is to request everything early, because the waiting is the slow part — not the filling in.
The checklist
Everything here is yours to action. Tick items off as you go; the sections below explain what each one is for and how to do it.
Access
- VPN or remote access to the legacy telecom environment — including any jump host, client certificate, or MFA enrolment.
- Logins to every legacy telecom environment (on-premise or cloud) — read-only preferred, all systems. Details
- Invite the RX3 project team to your Zoom tenant via Delegated Access. How
- Enable the Server-to-Server OAuth role for API access. How
Carrier and porting — repeat every item below for each losing carrier
- Request the Customer Service Record (CSR) from the losing carrier.
- Provide a copy of the latest invoice — last full month, every page.
- Request the port-out PIN from the losing carrier. Why these three
Directory
- Provide a directory export covering every user who will get a phone, with first name, last name, email address, and all telephone fields populated. Required fields
Access
RX3 needs to see the system you are leaving and the tenant you are moving to. Read-only is enough for the legacy side.
For the legacy environment that means the PBX, session border controller, voicemail system, contact centre, paging, fax, and any carrier portal — whether on-premise or cloud. All systems, not just the primary PBX: the ones that get forgotten are the ones that strand extensions at cutover. Include whatever is needed to reach them, such as a jump host, client certificate, or MFA enrolment.
For the Zoom side there are two separate grants, and they do different jobs.
Inviting RX3 via Delegated Access
A Zoom Admin that has Role Management (including the account owner) can do this procedure. If you do not see Roles in the side menu, ask the Account Owner to perform this action. This allows RX3 to access your Zoom tenant for configuration and management.
-
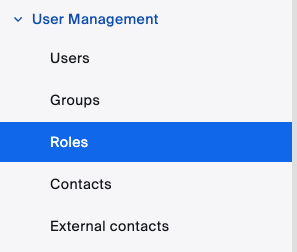
Sign in to the Zoom web portal and go to Admin -> User Management → Roles. You land on a list of the roles on your account.
-
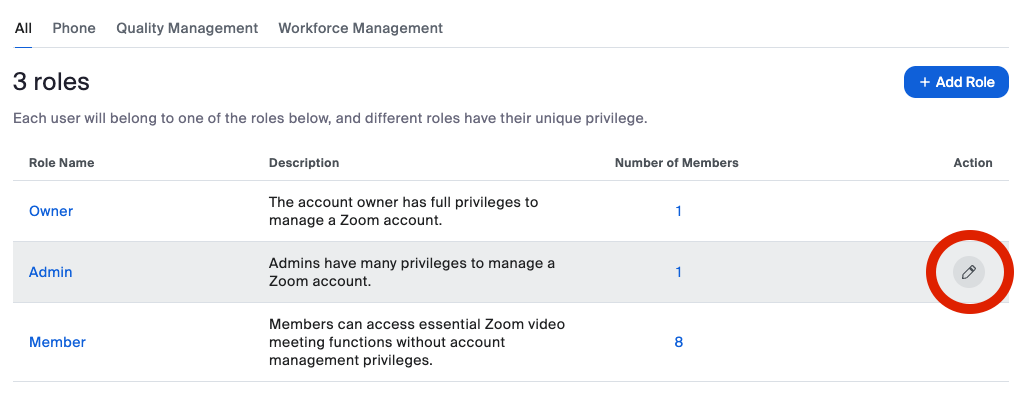
Open the Admin role by clicking the pencil icon in its Action column, on the right-hand end of the row.
-
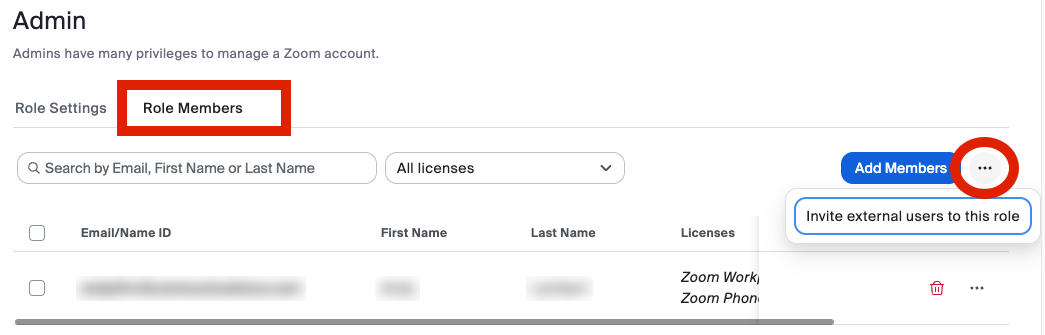
Select the Role Members tab, click the ⋯ (more) menu beside Add Members, then choose Invite external users to this role.
-
Accept the terms and conditions of Delegated Administration.
-
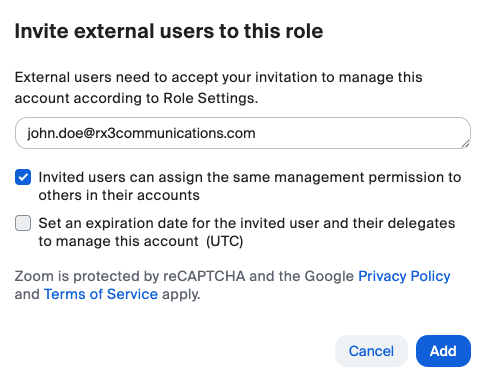
Enter the RX3 project team members' email addresses and click Add. Leave Invited users can assign the same management permission to others in their accounts ticked so your RX3 contact can bring in the rest of the project team without coming back to you.
Delegated Access is how RX3 builds your tenant
Until this is in place we can document your phone system but cannot build it. If your security policy does not permit external delegated access, tell your RX3 contact early so an alternative can be agreed — this is not a step to leave until build week.
Enabling the Server-to-Server OAuth role
Delegated Access covers work done in the portal. The API is how the bulk work gets done — creating users, extensions, and queues in volume, and validating what was built against what you asked for. That needs a Server-to-Server OAuth app, and the role has to permit one before anybody can create it.
An account admin, or a user with role-management permission, does this:
- Sign in to the Zoom web portal.
- Go to User Management → Roles.
- Open the role, then select Role Settings.
- Find Advanced features.
- Tick both View and Edit for Server-to-Server OAuth app.
That enables the capability. Creating the app itself produces three credentials — an Account ID, a Client ID, and a Client Secret — plus a set of scopes chosen for what the app needs to do. Your RX3 contact will tell you which scopes to grant.
The Client Secret is a credential — don't email it
Account ID, Client ID, and especially Client Secret grant programmatic access to your tenant. Send them the way your organisation sends passwords, not in a mail thread or a workbook cell. If a secret is ever exposed, regenerate it in the Zoom App Marketplace rather than leaving it in place.
Zoom's own guidance is here if your admin wants the source: Enable the Server-to-Server OAuth role.
Carrier and porting
Every losing carrier is a separate account and a separate set of requests — including the ones that only carry a handful of alarm, elevator, or fax lines.
The CSR is the carrier's authoritative list of every number on the account; a number that is not on it cannot be ported. The invoice is what the carrier validates your port request against, which is why it has to be the last full month and every page. The port-out PIN is frequently not your portal password and often has to be retrieved by phoning the carrier — it is the item most likely to be discovered missing at the worst moment.
Why each of these matters, and what a rejection looks like when one is wrong, is covered in the porting workbook: the invoice, the CSR, and the account number and PIN. That page also lists the rest of the porting paperwork — the Letter of Agency, authorised signer, and number dispositions — which follows once these three are in hand.
Directory
We build your users from your directory, not from a hand-typed list. Export from whichever system is authoritative for you — Active Directory, Google Workspace, Okta, Entra ID — and send the raw export.
| Field | Why we need it |
|---|---|
| First name | Display name and dial-by-name directory |
| Last name | Display name and dial-by-name directory |
| Email address | The Zoom Phone user key — it must match your SSO/SAML assertion exactly |
| Telephone fields | Any and all of them, populated — these are how we map existing extensions and DIDs to people |
Send every telephone field, even the messy ones
telephoneNumber, ipPhone, mobile, pager, and any custom attribute your
organisation uses. A field that looks like junk to you is often the only
record of which extension belongs to whom. We would rather reconcile a messy
export than guess.
Sample: Active Directory export to CSV
Change *****ZOOM_USERS_AD_GROUP***** to the group your Zoom users live in,
then run this from a machine with the ActiveDirectory module available. It
writes ad_users_all.csv to the current directory.
$properties = @('sAMAccountName','mail','proxyAddresses','displayName',
                'telephoneNumber','ipPhone','Enabled',
                'whenCreated','lastLogonTimestamp')

Get-ADGroupMember -Identity "*****ZOOM_USERS_AD_GROUP*****" -Recursive |
    Where-Object { $_.objectClass -eq 'user' } |
    Get-ADUser -Properties $properties |
    Select-Object sAMAccountName, mail,
                  @{n='proxyAddresses'; e={ ($_.proxyAddresses -join ';') }},
                  displayName,
                  telephoneNumber, ipPhone, Enabled,
                  @{n='whenCreated'; e={ if ($_.whenCreated) { $_.whenCreated.ToString('o') } else { $null } }},
                  @{n='lastLogonTimestamp'; e={ if ($_.lastLogonTimestamp) { [DateTime]::FromFileTimeUtc($_.lastLogonTimestamp).ToString('o') } else { $null } }},
                  DistinguishedName |
    Export-Csv -Path .\ad_users_all.csv -NoTypeInformation -Encoding UTF8
Not on Active Directory? Any export carrying the four fields above works — Google Workspace and Okta both export CSV from their admin consoles.
What happens next
Once the directory export is with us, RX3 pre-populates the Users & Devices workbook from it, so you are validating a filled-in sheet rather than typing one from scratch. See How the workbooks work for the conventions, then Users & Devices.